
How Do You Add a Signature in Outlook 365? Effortless Guide
Introduction,
How do you add a signature in Outlook 365? Utilizing emails has evolved into the primary form of Interaction in the workplace in today’s digital world. Regardless of whether you are sharing a very important business proposal or just an informal remark, an expertly designed email signature enhances expertise and contains the necessary contact information. Placing some style to your discussions and maintaining time may be achieved by quickly and easily setting up your signature in Outlook 365.
Table of Contents
ToggleThis article will explain how to add a signature to Outlook 365 and provide practical advice on how to adapt it to your needs, whether they be business or personal.
Why is an Email Signature Required in Outlook 365?
Let’s examine why creating a signature is crucial before getting into the specifics:
- Professionalism: Adding a signature to your emails gives them a polished appearance and demonstrates your attention to detail and established communication style.
- Consistency: You can make sure that recipients have the right contact information in all of your correspondence by signing each email.
- Brand Representation: You can strengthen your company’s brand, including logos, colors, and social media links, with your signature if you’re a business professional.
- Efficiency of Time: Through automation the procedure of Including your contact
details for every email, your signature saves time.
The fact that you are conscious of the advantages, Let’s have a peek at how to sign papers. in Outlook 365.
Step 1: Login with Office 365
You must first log into your Office 365 account to start configuring your signature. Take these actions:
- Open your web browser and visit the Office 365 official login page.
- To gain access to your account, enter your login credentials. email address and password.
You can continue creating your signature once you’ve logged in and have access to the Outlook 365 web application.
Step 2: 365 Outlook Online Login
The next step after logging into Office 365 is to configure your signature by going to Outlook 365 online. Here’s how:
- Locate and click the Outlook icon to launch your email client from the Office 365 dashboard.
All of your emails are now kept in 365 Outlook Online, where you may also control other settings, such as signatures.
Step 3: Open the Settings for Signature Management
You must go to Outlook 365’s settings to generate your signature. How to do it:
- To open the menu for settings, click the icon for gears situated in the top-right corner of the display.
- Choose View all Outlook settings after scrolling to the bottom.
Click Mail in the settings window, and from the list of options, choose Compose and Reply. You can personalize your signature here.
Step 4: Create Your Signature
Now is the time to start making your signature once you’ve located the relevant section.
This is how to do it:
- Type in your basic information: Start by entering the necessary specifics such as your name, title of position, name of the business, position title
Example:
makefile
Copy code
Sarah Johnson
Senior Project Manager
XYZ Solutions
Phone: xxx-xxx-xxxx
Email: abc.com
Website: www.abc.com
- Prepare Your Writing: Modify the typeface, size, and color of your signature to make It appears distinctive. To attract attention to important details, you can also make some material bolded or italicized.
To establish your reputation or position title stand out, for instance, you could bold it.
- Include a Logo or picture: To include a picture or logo, Select the Insert Picture icon, which resembles a tiny photo. This will upload your image. This might be the logo for your business or any other image you want to use.
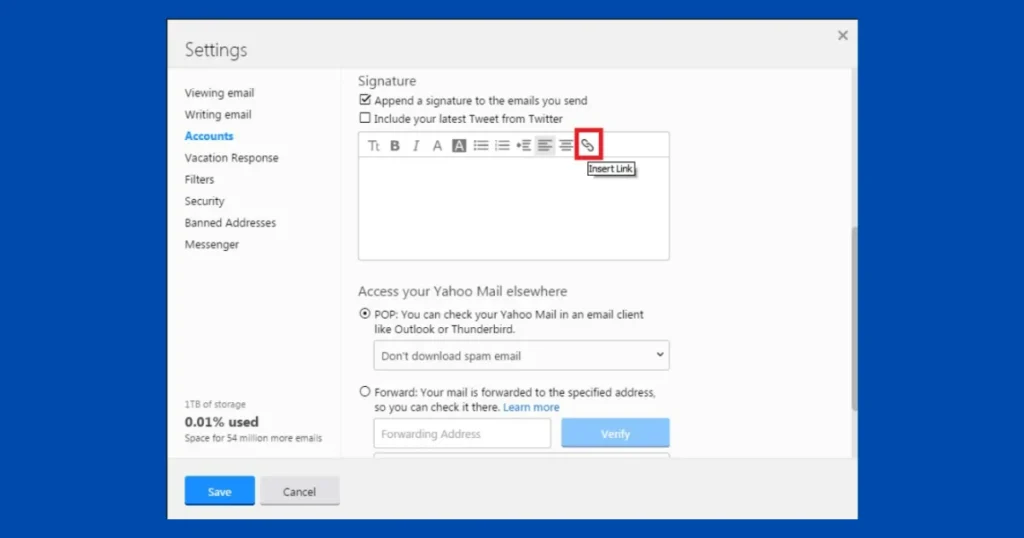
- Add Hyperlinks: Your signature can also contain clickable URLs. You could, for example, offer links to your business’s website, social media profiles. Click the Insert Link icon It looks like a chain link. after choosing the passage you want to connect.
Example:
- Add a link to your company’s homepage that says check out our website.
Step 5: Set Signature Preferences
You may save time by having Outlook 365 automatically add your signature to new emails and responses. To enable this:
- Scroll down below the signature editor where you’ll see two options:
- Automatically include my signature on new messages I compose.
- Automatically include my signature on messages I forward or reply to.
- Tick the boxes based on your preference:
- If you want the signature to be added to all emails, check both boxes.
- If you only want it in new emails and not replies or forwards, uncheck the second box.
Step 6: Save Your Signature
Ensure to save your changes once your content with the look of your signature. The Save button is found at the bottom of the page of settings. Depending on the settings you chose, your signature will show up in your emails automatically after saving.
To test it, click the new message to compose an email and check if your signature appears correctly.
Step 7: Edit or Update Your Signature
Should you ever require to make modifications to your signature, it’s easy to update it. Follow these steps:
- To see every Outlook options, Press the gear button icon in the top-right corner.
- Go to Mail > Compose and reply.
- Make the necessary edits to your signature and click Save.
Tips for Creating an Effective Signature
A well-designed signature reflects your professionalism and helps streamline communication. Here are some best practices to follow:
- Keep It Simple: Steer clear of packing your signature with excessive words. Simply add your name, the title, Contact information, and perhaps a logo.
- Utilize Professional, Clear Fonts: Professional-appearance and simple to read fonts include Times New Roman, Calibri, and Arial.
- Include a Call-to-Action: If preferred, you can include a CTA like View our most recent offering or observe us on LinkedIn to prompt recipients to take action.
- Test Your Signature: Make a few test emails to verify your signature is working properly. Verify that everything appears as it should, particularly if you have links or photos.
- Make it Consistent throughout Devices: Verify that your signature shows up accurately throughout Outlook 365 desktop, mobile, and online editions.
Troubleshooting Signature Issues
In Outlook 365, you could occasionally have issues with your signature. Here are some typical problems and how to fix them:
- Signature Not Appearing in Responses/Forwards: Verify that both choices for automatic inclusion are selected in your preferences if your signature isn’t appearing in responses or forwarded messages.
- Images Not Showing: Try uploading your logo or any images again, or make sure they are housed on a reputable server if they aren’t showing up correctly.
- Problems with Signature Formatting on Mobile: If your signature appears differently on a mobile device, make the layout simpler and stay away from big photos or odd typefaces.
Final Thought
How do you add a signature in Outlook 365. In Outlook 365, adding a signature is an easy yet effective approach to improve email correspondence. In addition to giving your emails a polished appearance, it guarantees consistency, which saves time and guarantees that recipients always have your contact information on hand.
Make and customize your signature in Outlook 365 by adhering to the directions in this article. You are able to create a signature that is both visually gratifying and useful, and that is ideal for your requirements, whether personal or professional, by observing optimal practices.
FAQs
Verify that you have selected the option to have your signature appended to new emails automatically if it isn’t appearing in them. The Compose and Respond part of your settings is where you can verify this setting.
Due to variations in email clients and screen widths, your signature may seem different on different devices. Avoid using huge images and make sure your signature works on mobile devices to maintain consistency.
Sign into Outlook 365, select the stuff symbol in the upper right corner, pick View all Standpoint settings, then, at that point, select Mail > Compose and answer to see the boundaries for the mark. You can plan and control your email signature here.
It is feasible to create greater than one signature and select which one to employ for new emails, replies, and Interactions that been sent on. Just choose the preferred signature from the Compose and Respond options.
Differences in email clients or device screens might lead to signature inconsistencies. Make sure your signature is straightforward, steer clear of odd typefaces or big images, and check for uniformity across devices.
Yes, you may make a custom signature in Outlook 365 using simple HTML. This enables you to add links, photos, and styling. JavaScript and other sophisticated HTML components might not be supported, though.


Thanks for sharing. I read many of your blog posts, cool, your blog is very good.
I don’t think the title of your article matches the content lol. Just kidding, mainly because I had some doubts after reading the article.
Thank you for your sharing. I am worried that I lack creative ideas. It is your article that makes me full of hope. Thank you. But, I have a question, can you help me?
Thanks for sharing. I read many of your blog posts, cool, your blog is very good.