By
Sher Gole
/ November 15, 2024 / 5 minutes of reading
Share this article
How to Clear Your Update Cache on Windows 11 and 10
Introducing How to Clear Your Update Cache on Windows
How to clear your update cache on Windows. An essential component of the Windows operating system, the Update Cache provides temporary storage for updated data downloaded via the Windows Update service. The system can quickly access and install updates thanks to this cache, which also speeds up the update process by removing the need for new internet downloads.
Windows uses the Update Cache as a storage area to hold temporary update-related files. Installation packages, fixes, and other data about updates are contained in these files. This cache’s primary goal is to make updates faster and more effective by minimizing the number of times that updates must be downloaded from the Windows Update servers.
Importance of Clearing Update Cache
Although the Update Cache speeds up updates, over time it may fill up with useless, corrupted, or outdated files. This accumulation may result in problems with updates, decreased performance, and unstable systems. It’s critical to often clear the Update Cache to preserve the functionality and health of your Windows machine.
How to Delete Windows 11's Update Cache
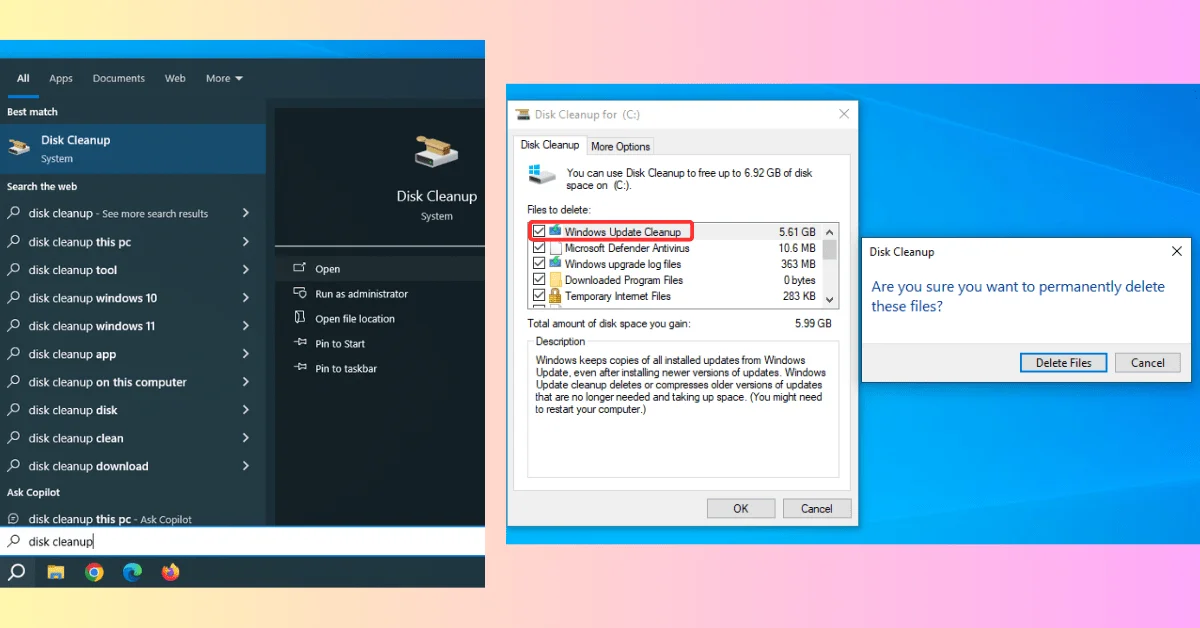
Step 1: Use the Disk Cleaning Tool
Disk space can be recovered by users utilizing the built-in Windows utility Disk Cleanup to delete temporary files, including those kept in the Update Cache.
To obtain the “Disk Cleanup” search outcome, press Win + S, input “Disk Cleanup,” and then pick it.
Select the disk (typically C:) on which Windows is installed.
Then select “Clean up system files.”
Click OK after checking the “Windows Update Cleanup” box.
Once the deletion has been confirmed, watch for the procedure to finish.
Step 2: Manually Deleting Cache Files
The Update Cache can be successfully cleared by hand-deleting the cache files, for users who like a more hands-on approach.
Type %windir%\SoftwareDistribution\Download into Win + R, hit Enter, and continue.
Everything in the Download folder should be deleted.
Once more, hit Win + R, type services.msc, and hit Enter.
Find “Windows Update” in the list, give it a right-click, then choose “Stop.”
Return to the Download folder and remove any files that are left.
“Windows Update” can be restarted by right-clicking on it in the Services box and choosing “Start.”
Potential Risks and Precautions
Although deleting the Update Cache can assist in fixing update-related problems, caution must be exercised to prevent unexpected repercussions. Before beginning any system maintenance operations, always make sure to backup important data, and carefully follow the instructions to prevent deleting crucial system files.
How to Delete Windows 10's Update Cache
Method 1: Making Use of Disk Cleanup Utility
The process for cleaning the Update Cache files in Win 10 and 11 since they both use the Disk Cleanup utility tool.
To gain access to the “Disk Cleanup”, press the Windows Key + R, type the “cleanmgr,” and then hit enter.
Pick the drive (typically C:) on which Windows is installed.
Then select “Clean up system files.”
Click OK after checking the “Windows Update Cleanup” box.
Once the deletion has been confirmed, watch for the procedure to finish.
Method 2: Windows Update Components Reset
Using the utility for disk cleanup to remove the cache files or reloading them could fix the problem, but one possible substitute is to reset the Windows Update components.
To begin the Command Prompt with administrative privileges, type CMD into the search bar and select “Run as Administrator”.
2. Enter each of the following commands after typing them:
net stop wuauserv
net stop cryptSvc
net stop bits
net stop msiserver
Press Enter after typing ren C:\Windows\SoftwareDistribution SoftwareDistribution.old. Hit Enter
4. After typing ren C:\Windows\System32\catroot2 catroot2.old.
5. To restart the services, enter these commands:
net start wuauserv
net start cryptSvc
net start bits
net start msiserver
Benefits of Regular Cache Clearing
1. Improved System Performance
Cleaning the Update Cache regularly can assist increase system speed by deleting obsolete and superfluous items that could be the cause of slowdowns. It can also free up valuable disk space.
2. Fixing Update-Related Problems
Users can ensure that the system is using the most recent and dependable update files and fix frequent update-related problems including update errors, installation failures, and system crashes by routinely clearing the Update Cache.
3. Improving the Stability of the System
By lowering the possibility of update conflicts, compatibility problems, and other issues that may emerge from utilizing old or corrupted update files, maintaining a clean and optimized Update Cache can help to improve system stability.
Advanced Troubleshooting for Update Issues
The Windows Update Troubleshooter is an in-built feature that separately locates and rectifies common Windows Update challenges.
Hit the Windows Key + I, then click on “Update & Security.”
Opt for “Troubleshoot” found in the left-side panel.
Within “Additional troubleshooters,” click on “Windows Update.”
In Summary,
How to clear your update cache on Windows. even if the Update Cache is essential to the update process, it is important to maintain it. Users can receive a multitude of advantages by clearing the Update Cache proactively and knowledgeably, including increased resilience against update-related problems and improved system performance and stability. So why hold off? Take a look, empty the cache, and see for yourself how much a clean, optimized Windows system can change your life right now!
I’m Sher Gole, a tech blogger, website developer, and the creator of TechSherGole. I simplify complex tech topics, covering gadgets, software, and AI trends. When I’m not writing, I explore new technologies and enhance web experiences.
Sorry for the huge review, but I’m really loving the new Zune, and hope this, as well as the excellent reviews some other people have written, will help you decide if it’s the right choice for you.
Sorry for the huge review, but I’m really loving the new Zune, and hope this, as well as the excellent reviews some other people have written, will help you decide if it’s the right choice for you.
I’ll gear this review to 2 types of people: current Zune owners who are considering an upgrade, and people trying to decide between a Zune and an iPod. (There are other players worth considering out there, like the Sony Walkman X, but I hope this gives you enough info to make an informed decision of the Zune vs players other than the iPod line as well.)
I’ll gear this review to 2 types of people: current Zune owners who are considering an upgrade, and people trying to decide between a Zune and an iPod. (There are other players worth considering out there, like the Sony Walkman X, but I hope this gives you enough info to make an informed decision of the Zune vs players other than the iPod line as well.)
I’ll gear this review to 2 types of people: current Zune owners who are considering an upgrade, and people trying to decide between a Zune and an iPod. (There are other players worth considering out there, like the Sony Walkman X, but I hope this gives you enough info to make an informed decision of the Zune vs players other than the iPod line as well.)
If you’re still on the fence: grab your favorite earphones, head down to a Best Buy and ask to plug them into a Zune then an iPod and see which one sounds better to you, and which interface makes you smile more. Then you’ll know which is right for you.
Hands down, Apple’s app store wins by a mile. It’s a huge selection of all sorts of apps vs a rather sad selection of a handful for Zune. Microsoft has plans, especially in the realm of games, but I’m not sure I’d want to bet on the future if this aspect is important to you. The iPod is a much better choice in that case.
If you’re still on the fence: grab your favorite earphones, head down to a Best Buy and ask to plug them into a Zune then an iPod and see which one sounds better to you, and which interface makes you smile more. Then you’ll know which is right for you.
I’ll gear this review to 2 types of people: current Zune owners who are considering an upgrade, and people trying to decide between a Zune and an iPod. (There are other players worth considering out there, like the Sony Walkman X, but I hope this gives you enough info to make an informed decision of the Zune vs players other than the iPod line as well.)
The new Zune browser is surprisingly good, but not as good as the iPod’s. It works well, but isn’t as fast as Safari, and has a clunkier interface. If you occasionally plan on using the web browser that’s not an issue, but if you’re planning to browse the web alot from your PMP then the iPod’s larger screen and better browser may be important.
Between me and my husband we’ve owned more MP3 players over the years than I can count, including Sansas, iRivers, iPods (classic & touch), the Ibiza Rhapsody, etc. But, the last few years I’ve settled down to one line of players. Why? Because I was happy to discover how well-designed and fun to use the underappreciated (and widely mocked) Zunes are.
Zune and iPod: Most people compare the Zune to the Touch, but after seeing how slim and surprisingly small and light it is, I consider it to be a rather unique hybrid that combines qualities of both the Touch and the Nano. It’s very colorful and lovely OLED screen is slightly smaller than the touch screen, but the player itself feels quite a bit smaller and lighter. It weighs about 2/3 as much, and is noticeably smaller in width and height, while being just a hair thicker.
I’ll gear this review to 2 types of people: current Zune owners who are considering an upgrade, and people trying to decide between a Zune and an iPod. (There are other players worth considering out there, like the Sony Walkman X, but I hope this gives you enough info to make an informed decision of the Zune vs players other than the iPod line as well.)
The new Zune browser is surprisingly good, but not as good as the iPod’s. It works well, but isn’t as fast as Safari, and has a clunkier interface. If you occasionally plan on using the web browser that’s not an issue, but if you’re planning to browse the web alot from your PMP then the iPod’s larger screen and better browser may be important.
Zune and iPod: Most people compare the Zune to the Touch, but after seeing how slim and surprisingly small and light it is, I consider it to be a rather unique hybrid that combines qualities of both the Touch and the Nano. It’s very colorful and lovely OLED screen is slightly smaller than the touch screen, but the player itself feels quite a bit smaller and lighter. It weighs about 2/3 as much, and is noticeably smaller in width and height, while being just a hair thicker.
If you’re still on the fence: grab your favorite earphones, head down to a Best Buy and ask to plug them into a Zune then an iPod and see which one sounds better to you, and which interface makes you smile more. Then you’ll know which is right for you.
This is getting a bit more subjective, but I much prefer the Zune Marketplace. The interface is colorful, has more flair, and some cool features like ‘Mixview’ that let you quickly see related albums, songs, or other users related to what you’re listening to. Clicking on one of those will center on that item, and another set of “neighbors” will come into view, allowing you to navigate around exploring by similar artists, songs, or users. Speaking of users, the Zune “Social” is also great fun, letting you find others with shared tastes and becoming friends with them. You then can listen to a playlist created based on an amalgamation of what all your friends are listening to, which is also enjoyable. Those concerned with privacy will be relieved to know you can prevent the public from seeing your personal listening habits if you so choose.
Zune and iPod: Most people compare the Zune to the Touch, but after seeing how slim and surprisingly small and light it is, I consider it to be a rather unique hybrid that combines qualities of both the Touch and the Nano. It’s very colorful and lovely OLED screen is slightly smaller than the touch screen, but the player itself feels quite a bit smaller and lighter. It weighs about 2/3 as much, and is noticeably smaller in width and height, while being just a hair thicker.
Sorry for the huge review, but I’m really loving the new Zune, and hope this, as well as the excellent reviews some other people have written, will help you decide if it’s the right choice for you.
The new Zune browser is surprisingly good, but not as good as the iPod’s. It works well, but isn’t as fast as Safari, and has a clunkier interface. If you occasionally plan on using the web browser that’s not an issue, but if you’re planning to browse the web alot from your PMP then the iPod’s larger screen and better browser may be important.
The new Zune browser is surprisingly good, but not as good as the iPod’s. It works well, but isn’t as fast as Safari, and has a clunkier interface. If you occasionally plan on using the web browser that’s not an issue, but if you’re planning to browse the web alot from your PMP then the iPod’s larger screen and better browser may be important.
Sorry for the huge review, but I’m really loving the new Zune, and hope this, as well as the excellent reviews some other people have written, will help you decide if it’s the right choice for you.
The new Zune browser is surprisingly good, but not as good as the iPod’s. It works well, but isn’t as fast as Safari, and has a clunkier interface. If you occasionally plan on using the web browser that’s not an issue, but if you’re planning to browse the web alot from your PMP then the iPod’s larger screen and better browser may be important.
Zune and iPod: Most people compare the Zune to the Touch, but after seeing how slim and surprisingly small and light it is, I consider it to be a rather unique hybrid that combines qualities of both the Touch and the Nano. It’s very colorful and lovely OLED screen is slightly smaller than the touch screen, but the player itself feels quite a bit smaller and lighter. It weighs about 2/3 as much, and is noticeably smaller in width and height, while being just a hair thicker.
Apple now has Rhapsody as an app, which is a great start, but it is currently hampered by the inability to store locally on your iPod, and has a dismal 64kbps bit rate. If this changes, then it will somewhat negate this advantage for the Zune, but the 10 songs per month will still be a big plus in Zune Pass’ favor.
Hands down, Apple’s app store wins by a mile. It’s a huge selection of all sorts of apps vs a rather sad selection of a handful for Zune. Microsoft has plans, especially in the realm of games, but I’m not sure I’d want to bet on the future if this aspect is important to you. The iPod is a much better choice in that case.
This is getting a bit more subjective, but I much prefer the Zune Marketplace. The interface is colorful, has more flair, and some cool features like ‘Mixview’ that let you quickly see related albums, songs, or other users related to what you’re listening to. Clicking on one of those will center on that item, and another set of “neighbors” will come into view, allowing you to navigate around exploring by similar artists, songs, or users. Speaking of users, the Zune “Social” is also great fun, letting you find others with shared tastes and becoming friends with them. You then can listen to a playlist created based on an amalgamation of what all your friends are listening to, which is also enjoyable. Those concerned with privacy will be relieved to know you can prevent the public from seeing your personal listening habits if you so choose.
If you’re still on the fence: grab your favorite earphones, head down to a Best Buy and ask to plug them into a Zune then an iPod and see which one sounds better to you, and which interface makes you smile more. Then you’ll know which is right for you.
Apple now has Rhapsody as an app, which is a great start, but it is currently hampered by the inability to store locally on your iPod, and has a dismal 64kbps bit rate. If this changes, then it will somewhat negate this advantage for the Zune, but the 10 songs per month will still be a big plus in Zune Pass’ favor.
If you’re still on the fence: grab your favorite earphones, head down to a Best Buy and ask to plug them into a Zune then an iPod and see which one sounds better to you, and which interface makes you smile more. Then you’ll know which is right for you.
This is getting a bit more subjective, but I much prefer the Zune Marketplace. The interface is colorful, has more flair, and some cool features like ‘Mixview’ that let you quickly see related albums, songs, or other users related to what you’re listening to. Clicking on one of those will center on that item, and another set of “neighbors” will come into view, allowing you to navigate around exploring by similar artists, songs, or users. Speaking of users, the Zune “Social” is also great fun, letting you find others with shared tastes and becoming friends with them. You then can listen to a playlist created based on an amalgamation of what all your friends are listening to, which is also enjoyable. Those concerned with privacy will be relieved to know you can prevent the public from seeing your personal listening habits if you so choose.
If you’re still on the fence: grab your favorite earphones, head down to a Best Buy and ask to plug them into a Zune then an iPod and see which one sounds better to you, and which interface makes you smile more. Then you’ll know which is right for you.
Hands down, Apple’s app store wins by a mile. It’s a huge selection of all sorts of apps vs a rather sad selection of a handful for Zune. Microsoft has plans, especially in the realm of games, but I’m not sure I’d want to bet on the future if this aspect is important to you. The iPod is a much better choice in that case.
The new Zune browser is surprisingly good, but not as good as the iPod’s. It works well, but isn’t as fast as Safari, and has a clunkier interface. If you occasionally plan on using the web browser that’s not an issue, but if you’re planning to browse the web alot from your PMP then the iPod’s larger screen and better browser may be important.
This is getting a bit more subjective, but I much prefer the Zune Marketplace. The interface is colorful, has more flair, and some cool features like ‘Mixview’ that let you quickly see related albums, songs, or other users related to what you’re listening to. Clicking on one of those will center on that item, and another set of “neighbors” will come into view, allowing you to navigate around exploring by similar artists, songs, or users. Speaking of users, the Zune “Social” is also great fun, letting you find others with shared tastes and becoming friends with them. You then can listen to a playlist created based on an amalgamation of what all your friends are listening to, which is also enjoyable. Those concerned with privacy will be relieved to know you can prevent the public from seeing your personal listening habits if you so choose.
This is getting a bit more subjective, but I much prefer the Zune Marketplace. The interface is colorful, has more flair, and some cool features like ‘Mixview’ that let you quickly see related albums, songs, or other users related to what you’re listening to. Clicking on one of those will center on that item, and another set of “neighbors” will come into view, allowing you to navigate around exploring by similar artists, songs, or users. Speaking of users, the Zune “Social” is also great fun, letting you find others with shared tastes and becoming friends with them. You then can listen to a playlist created based on an amalgamation of what all your friends are listening to, which is also enjoyable. Those concerned with privacy will be relieved to know you can prevent the public from seeing your personal listening habits if you so choose.
Sorry for the huge review, but I’m really loving the new Zune, and hope this, as well as the excellent reviews some other people have written, will help you decide if it’s the right choice for you.
I’m really impressed with your writing skills and also with the layout on your blog. Is this a paid theme or did you modify it yourself? Either way keep up the nice quality writing, it’s rare to see a nice blog like this one today..
Apple now has Rhapsody as an app, which is a great start, but it is currently hampered by the inability to store locally on your iPod, and has a dismal 64kbps bit rate. If this changes, then it will somewhat negate this advantage for the Zune, but the 10 songs per month will still be a big plus in Zune Pass’ favor.
I’ll gear this review to 2 types of people: current Zune owners who are considering an upgrade, and people trying to decide between a Zune and an iPod. (There are other players worth considering out there, like the Sony Walkman X, but I hope this gives you enough info to make an informed decision of the Zune vs players other than the iPod line as well.)
Between me and my husband we’ve owned more MP3 players over the years than I can count, including Sansas, iRivers, iPods (classic & touch), the Ibiza Rhapsody, etc. But, the last few years I’ve settled down to one line of players. Why? Because I was happy to discover how well-designed and fun to use the underappreciated (and widely mocked) Zunes are.
This is getting a bit more subjective, but I much prefer the Zune Marketplace. The interface is colorful, has more flair, and some cool features like ‘Mixview’ that let you quickly see related albums, songs, or other users related to what you’re listening to. Clicking on one of those will center on that item, and another set of “neighbors” will come into view, allowing you to navigate around exploring by similar artists, songs, or users. Speaking of users, the Zune “Social” is also great fun, letting you find others with shared tastes and becoming friends with them. You then can listen to a playlist created based on an amalgamation of what all your friends are listening to, which is also enjoyable. Those concerned with privacy will be relieved to know you can prevent the public from seeing your personal listening habits if you so choose.
The new Zune browser is surprisingly good, but not as good as the iPod’s. It works well, but isn’t as fast as Safari, and has a clunkier interface. If you occasionally plan on using the web browser that’s not an issue, but if you’re planning to browse the web alot from your PMP then the iPod’s larger screen and better browser may be important.
If you’re still on the fence: grab your favorite earphones, head down to a Best Buy and ask to plug them into a Zune then an iPod and see which one sounds better to you, and which interface makes you smile more. Then you’ll know which is right for you.
This is getting a bit more subjective, but I much prefer the Zune Marketplace. The interface is colorful, has more flair, and some cool features like ‘Mixview’ that let you quickly see related albums, songs, or other users related to what you’re listening to. Clicking on one of those will center on that item, and another set of “neighbors” will come into view, allowing you to navigate around exploring by similar artists, songs, or users. Speaking of users, the Zune “Social” is also great fun, letting you find others with shared tastes and becoming friends with them. You then can listen to a playlist created based on an amalgamation of what all your friends are listening to, which is also enjoyable. Those concerned with privacy will be relieved to know you can prevent the public from seeing your personal listening habits if you so choose.
Hands down, Apple’s app store wins by a mile. It’s a huge selection of all sorts of apps vs a rather sad selection of a handful for Zune. Microsoft has plans, especially in the realm of games, but I’m not sure I’d want to bet on the future if this aspect is important to you. The iPod is a much better choice in that case.
Sorry for the huge review, but I’m really loving the new Zune, and hope this, as well as the excellent reviews some other people have written, will help you decide if it’s the right choice for you.
Between me and my husband we’ve owned more MP3 players over the years than I can count, including Sansas, iRivers, iPods (classic & touch), the Ibiza Rhapsody, etc. But, the last few years I’ve settled down to one line of players. Why? Because I was happy to discover how well-designed and fun to use the underappreciated (and widely mocked) Zunes are.
The new Zune browser is surprisingly good, but not as good as the iPod’s. It works well, but isn’t as fast as Safari, and has a clunkier interface. If you occasionally plan on using the web browser that’s not an issue, but if you’re planning to browse the web alot from your PMP then the iPod’s larger screen and better browser may be important.
What’s Going down i am new to this, I stumbled upon this I have found It positively useful and it has aided me out loads. I’m hoping to give a contribution & help other customers like its helped me. Good job.
I’ll gear this review to 2 types of people: current Zune owners who are considering an upgrade, and people trying to decide between a Zune and an iPod. (There are other players worth considering out there, like the Sony Walkman X, but I hope this gives you enough info to make an informed decision of the Zune vs players other than the iPod line as well.)
This is getting a bit more subjective, but I much prefer the Zune Marketplace. The interface is colorful, has more flair, and some cool features like ‘Mixview’ that let you quickly see related albums, songs, or other users related to what you’re listening to. Clicking on one of those will center on that item, and another set of “neighbors” will come into view, allowing you to navigate around exploring by similar artists, songs, or users. Speaking of users, the Zune “Social” is also great fun, letting you find others with shared tastes and becoming friends with them. You then can listen to a playlist created based on an amalgamation of what all your friends are listening to, which is also enjoyable. Those concerned with privacy will be relieved to know you can prevent the public from seeing your personal listening habits if you so choose.
This is getting a bit more subjective, but I much prefer the Zune Marketplace. The interface is colorful, has more flair, and some cool features like ‘Mixview’ that let you quickly see related albums, songs, or other users related to what you’re listening to. Clicking on one of those will center on that item, and another set of “neighbors” will come into view, allowing you to navigate around exploring by similar artists, songs, or users. Speaking of users, the Zune “Social” is also great fun, letting you find others with shared tastes and becoming friends with them. You then can listen to a playlist created based on an amalgamation of what all your friends are listening to, which is also enjoyable. Those concerned with privacy will be relieved to know you can prevent the public from seeing your personal listening habits if you so choose.
Hands down, Apple’s app store wins by a mile. It’s a huge selection of all sorts of apps vs a rather sad selection of a handful for Zune. Microsoft has plans, especially in the realm of games, but I’m not sure I’d want to bet on the future if this aspect is important to you. The iPod is a much better choice in that case.
The new Zune browser is surprisingly good, but not as good as the iPod’s. It works well, but isn’t as fast as Safari, and has a clunkier interface. If you occasionally plan on using the web browser that’s not an issue, but if you’re planning to browse the web alot from your PMP then the iPod’s larger screen and better browser may be important.
Hands down, Apple’s app store wins by a mile. It’s a huge selection of all sorts of apps vs a rather sad selection of a handful for Zune. Microsoft has plans, especially in the realm of games, but I’m not sure I’d want to bet on the future if this aspect is important to you. The iPod is a much better choice in that case.
You actually make it seem really easy with your presentation but I to find this matter to be actually one thing that I believe I’d by no means understand. It kind of feels too complex and very vast for me. I am having a look forward for your subsequent put up, I’ll attempt to get the cling of it!
What’s Taking place i am new to this, I stumbled upon this I’ve discovered It positively helpful and it has aided me out loads. I am hoping to contribute & help different customers like its helped me. Great job.
Hands down, Apple’s app store wins by a mile. It’s a huge selection of all sorts of apps vs a rather sad selection of a handful for Zune. Microsoft has plans, especially in the realm of games, but I’m not sure I’d want to bet on the future if this aspect is important to you. The iPod is a much better choice in that case.
The Zune concentrates on being a Portable Media Player. Not a web browser. Not a game machine. Maybe in the future it’ll do even better in those areas, but for now it’s a fantastic way to organize and listen to your music and videos, and is without peer in that regard. The iPod’s strengths are its web browsing and apps. If those sound more compelling, perhaps it is your best choice.
Sorry for the huge review, but I’m really loving the new Zune, and hope this, as well as the excellent reviews some other people have written, will help you decide if it’s the right choice for you.
Zune and iPod: Most people compare the Zune to the Touch, but after seeing how slim and surprisingly small and light it is, I consider it to be a rather unique hybrid that combines qualities of both the Touch and the Nano. It’s very colorful and lovely OLED screen is slightly smaller than the touch screen, but the player itself feels quite a bit smaller and lighter. It weighs about 2/3 as much, and is noticeably smaller in width and height, while being just a hair thicker.
Between me and my husband we’ve owned more MP3 players over the years than I can count, including Sansas, iRivers, iPods (classic & touch), the Ibiza Rhapsody, etc. But, the last few years I’ve settled down to one line of players. Why? Because I was happy to discover how well-designed and fun to use the underappreciated (and widely mocked) Zunes are.
Apple now has Rhapsody as an app, which is a great start, but it is currently hampered by the inability to store locally on your iPod, and has a dismal 64kbps bit rate. If this changes, then it will somewhat negate this advantage for the Zune, but the 10 songs per month will still be a big plus in Zune Pass’ favor.
Apple now has Rhapsody as an app, which is a great start, but it is currently hampered by the inability to store locally on your iPod, and has a dismal 64kbps bit rate. If this changes, then it will somewhat negate this advantage for the Zune, but the 10 songs per month will still be a big plus in Zune Pass’ favor.
Apple now has Rhapsody as an app, which is a great start, but it is currently hampered by the inability to store locally on your iPod, and has a dismal 64kbps bit rate. If this changes, then it will somewhat negate this advantage for the Zune, but the 10 songs per month will still be a big plus in Zune Pass’ favor.
Between me and my husband we’ve owned more MP3 players over the years than I can count, including Sansas, iRivers, iPods (classic & touch), the Ibiza Rhapsody, etc. But, the last few years I’ve settled down to one line of players. Why? Because I was happy to discover how well-designed and fun to use the underappreciated (and widely mocked) Zunes are.
This is getting a bit more subjective, but I much prefer the Zune Marketplace. The interface is colorful, has more flair, and some cool features like ‘Mixview’ that let you quickly see related albums, songs, or other users related to what you’re listening to. Clicking on one of those will center on that item, and another set of “neighbors” will come into view, allowing you to navigate around exploring by similar artists, songs, or users. Speaking of users, the Zune “Social” is also great fun, letting you find others with shared tastes and becoming friends with them. You then can listen to a playlist created based on an amalgamation of what all your friends are listening to, which is also enjoyable. Those concerned with privacy will be relieved to know you can prevent the public from seeing your personal listening habits if you so choose.
This perspective really made me think differently about an issue I thought I had all figured out. The way you challenged conventional wisdom was thought-provoking. I’ll be considering your points in my own approach moving forward.
Hands down, Apple’s app store wins by a mile. It’s a huge selection of all sorts of apps vs a rather sad selection of a handful for Zune. Microsoft has plans, especially in the realm of games, but I’m not sure I’d want to bet on the future if this aspect is important to you. The iPod is a much better choice in that case.
I’ll gear this review to 2 types of people: current Zune owners who are considering an upgrade, and people trying to decide between a Zune and an iPod. (There are other players worth considering out there, like the Sony Walkman X, but I hope this gives you enough info to make an informed decision of the Zune vs players other than the iPod line as well.)
The Zune concentrates on being a Portable Media Player. Not a web browser. Not a game machine. Maybe in the future it’ll do even better in those areas, but for now it’s a fantastic way to organize and listen to your music and videos, and is without peer in that regard. The iPod’s strengths are its web browsing and apps. If those sound more compelling, perhaps it is your best choice.
The Zune concentrates on being a Portable Media Player. Not a web browser. Not a game machine. Maybe in the future it’ll do even better in those areas, but for now it’s a fantastic way to organize and listen to your music and videos, and is without peer in that regard. The iPod’s strengths are its web browsing and apps. If those sound more compelling, perhaps it is your best choice.
Sorry for the huge review, but I’m really loving the new Zune, and hope this, as well as the excellent reviews some other people have written, will help you decide if it’s the right choice for you.
I’ll gear this review to 2 types of people: current Zune owners who are considering an upgrade, and people trying to decide between a Zune and an iPod. (There are other players worth considering out there, like the Sony Walkman X, but I hope this gives you enough info to make an informed decision of the Zune vs players other than the iPod line as well.)
The Zune concentrates on being a Portable Media Player. Not a web browser. Not a game machine. Maybe in the future it’ll do even better in those areas, but for now it’s a fantastic way to organize and listen to your music and videos, and is without peer in that regard. The iPod’s strengths are its web browsing and apps. If those sound more compelling, perhaps it is your best choice.
Sorry for the huge review, but I’m really loving the new Zune, and hope this, as well as the excellent reviews some other people have written, will help you decide if it’s the right choice for you.
Between me and my husband we’ve owned more MP3 players over the years than I can count, including Sansas, iRivers, iPods (classic & touch), the Ibiza Rhapsody, etc. But, the last few years I’ve settled down to one line of players. Why? Because I was happy to discover how well-designed and fun to use the underappreciated (and widely mocked) Zunes are.
The Zune concentrates on being a Portable Media Player. Not a web browser. Not a game machine. Maybe in the future it’ll do even better in those areas, but for now it’s a fantastic way to organize and listen to your music and videos, and is without peer in that regard. The iPod’s strengths are its web browsing and apps. If those sound more compelling, perhaps it is your best choice.
Sorry for the huge review, but I’m really loving the new Zune, and hope this, as well as the excellent reviews some other people have written, will help you decide if it’s the right choice for you.
I’ll gear this review to 2 types of people: current Zune owners who are considering an upgrade, and people trying to decide between a Zune and an iPod. (There are other players worth considering out there, like the Sony Walkman X, but I hope this gives you enough info to make an informed decision of the Zune vs players other than the iPod line as well.)
The Zune concentrates on being a Portable Media Player. Not a web browser. Not a game machine. Maybe in the future it’ll do even better in those areas, but for now it’s a fantastic way to organize and listen to your music and videos, and is without peer in that regard. The iPod’s strengths are its web browsing and apps. If those sound more compelling, perhaps it is your best choice.
Apple now has Rhapsody as an app, which is a great start, but it is currently hampered by the inability to store locally on your iPod, and has a dismal 64kbps bit rate. If this changes, then it will somewhat negate this advantage for the Zune, but the 10 songs per month will still be a big plus in Zune Pass’ favor.
The Zune concentrates on being a Portable Media Player. Not a web browser. Not a game machine. Maybe in the future it’ll do even better in those areas, but for now it’s a fantastic way to organize and listen to your music and videos, and is without peer in that regard. The iPod’s strengths are its web browsing and apps. If those sound more compelling, perhaps it is your best choice.
The Zune concentrates on being a Portable Media Player. Not a web browser. Not a game machine. Maybe in the future it’ll do even better in those areas, but for now it’s a fantastic way to organize and listen to your music and videos, and is without peer in that regard. The iPod’s strengths are its web browsing and apps. If those sound more compelling, perhaps it is your best choice.


Pingback: How To Use Windows Update Assistant
Sorry for the huge review, but I’m really loving the new Zune, and hope this, as well as the excellent reviews some other people have written, will help you decide if it’s the right choice for you.
Sorry for the huge review, but I’m really loving the new Zune, and hope this, as well as the excellent reviews some other people have written, will help you decide if it’s the right choice for you.
I’ll gear this review to 2 types of people: current Zune owners who are considering an upgrade, and people trying to decide between a Zune and an iPod. (There are other players worth considering out there, like the Sony Walkman X, but I hope this gives you enough info to make an informed decision of the Zune vs players other than the iPod line as well.)
I’ll gear this review to 2 types of people: current Zune owners who are considering an upgrade, and people trying to decide between a Zune and an iPod. (There are other players worth considering out there, like the Sony Walkman X, but I hope this gives you enough info to make an informed decision of the Zune vs players other than the iPod line as well.)
I’ll gear this review to 2 types of people: current Zune owners who are considering an upgrade, and people trying to decide between a Zune and an iPod. (There are other players worth considering out there, like the Sony Walkman X, but I hope this gives you enough info to make an informed decision of the Zune vs players other than the iPod line as well.)
If you’re still on the fence: grab your favorite earphones, head down to a Best Buy and ask to plug them into a Zune then an iPod and see which one sounds better to you, and which interface makes you smile more. Then you’ll know which is right for you.
Hands down, Apple’s app store wins by a mile. It’s a huge selection of all sorts of apps vs a rather sad selection of a handful for Zune. Microsoft has plans, especially in the realm of games, but I’m not sure I’d want to bet on the future if this aspect is important to you. The iPod is a much better choice in that case.
If you’re still on the fence: grab your favorite earphones, head down to a Best Buy and ask to plug them into a Zune then an iPod and see which one sounds better to you, and which interface makes you smile more. Then you’ll know which is right for you.
I’ll gear this review to 2 types of people: current Zune owners who are considering an upgrade, and people trying to decide between a Zune and an iPod. (There are other players worth considering out there, like the Sony Walkman X, but I hope this gives you enough info to make an informed decision of the Zune vs players other than the iPod line as well.)
The new Zune browser is surprisingly good, but not as good as the iPod’s. It works well, but isn’t as fast as Safari, and has a clunkier interface. If you occasionally plan on using the web browser that’s not an issue, but if you’re planning to browse the web alot from your PMP then the iPod’s larger screen and better browser may be important.
Between me and my husband we’ve owned more MP3 players over the years than I can count, including Sansas, iRivers, iPods (classic & touch), the Ibiza Rhapsody, etc. But, the last few years I’ve settled down to one line of players. Why? Because I was happy to discover how well-designed and fun to use the underappreciated (and widely mocked) Zunes are.
Zune and iPod: Most people compare the Zune to the Touch, but after seeing how slim and surprisingly small and light it is, I consider it to be a rather unique hybrid that combines qualities of both the Touch and the Nano. It’s very colorful and lovely OLED screen is slightly smaller than the touch screen, but the player itself feels quite a bit smaller and lighter. It weighs about 2/3 as much, and is noticeably smaller in width and height, while being just a hair thicker.
Very clean website , appreciate it for this post.
I’ll gear this review to 2 types of people: current Zune owners who are considering an upgrade, and people trying to decide between a Zune and an iPod. (There are other players worth considering out there, like the Sony Walkman X, but I hope this gives you enough info to make an informed decision of the Zune vs players other than the iPod line as well.)
The new Zune browser is surprisingly good, but not as good as the iPod’s. It works well, but isn’t as fast as Safari, and has a clunkier interface. If you occasionally plan on using the web browser that’s not an issue, but if you’re planning to browse the web alot from your PMP then the iPod’s larger screen and better browser may be important.
Rattling great info can be found on web site. “I am not merry but I do beguile The thing I am, by seeming otherwise.” by William Shakespeare.
Zune and iPod: Most people compare the Zune to the Touch, but after seeing how slim and surprisingly small and light it is, I consider it to be a rather unique hybrid that combines qualities of both the Touch and the Nano. It’s very colorful and lovely OLED screen is slightly smaller than the touch screen, but the player itself feels quite a bit smaller and lighter. It weighs about 2/3 as much, and is noticeably smaller in width and height, while being just a hair thicker.
If you’re still on the fence: grab your favorite earphones, head down to a Best Buy and ask to plug them into a Zune then an iPod and see which one sounds better to you, and which interface makes you smile more. Then you’ll know which is right for you.
This is getting a bit more subjective, but I much prefer the Zune Marketplace. The interface is colorful, has more flair, and some cool features like ‘Mixview’ that let you quickly see related albums, songs, or other users related to what you’re listening to. Clicking on one of those will center on that item, and another set of “neighbors” will come into view, allowing you to navigate around exploring by similar artists, songs, or users. Speaking of users, the Zune “Social” is also great fun, letting you find others with shared tastes and becoming friends with them. You then can listen to a playlist created based on an amalgamation of what all your friends are listening to, which is also enjoyable. Those concerned with privacy will be relieved to know you can prevent the public from seeing your personal listening habits if you so choose.
Zune and iPod: Most people compare the Zune to the Touch, but after seeing how slim and surprisingly small and light it is, I consider it to be a rather unique hybrid that combines qualities of both the Touch and the Nano. It’s very colorful and lovely OLED screen is slightly smaller than the touch screen, but the player itself feels quite a bit smaller and lighter. It weighs about 2/3 as much, and is noticeably smaller in width and height, while being just a hair thicker.
Sorry for the huge review, but I’m really loving the new Zune, and hope this, as well as the excellent reviews some other people have written, will help you decide if it’s the right choice for you.
The new Zune browser is surprisingly good, but not as good as the iPod’s. It works well, but isn’t as fast as Safari, and has a clunkier interface. If you occasionally plan on using the web browser that’s not an issue, but if you’re planning to browse the web alot from your PMP then the iPod’s larger screen and better browser may be important.
The new Zune browser is surprisingly good, but not as good as the iPod’s. It works well, but isn’t as fast as Safari, and has a clunkier interface. If you occasionally plan on using the web browser that’s not an issue, but if you’re planning to browse the web alot from your PMP then the iPod’s larger screen and better browser may be important.
Sorry for the huge review, but I’m really loving the new Zune, and hope this, as well as the excellent reviews some other people have written, will help you decide if it’s the right choice for you.
The new Zune browser is surprisingly good, but not as good as the iPod’s. It works well, but isn’t as fast as Safari, and has a clunkier interface. If you occasionally plan on using the web browser that’s not an issue, but if you’re planning to browse the web alot from your PMP then the iPod’s larger screen and better browser may be important.
Zune and iPod: Most people compare the Zune to the Touch, but after seeing how slim and surprisingly small and light it is, I consider it to be a rather unique hybrid that combines qualities of both the Touch and the Nano. It’s very colorful and lovely OLED screen is slightly smaller than the touch screen, but the player itself feels quite a bit smaller and lighter. It weighs about 2/3 as much, and is noticeably smaller in width and height, while being just a hair thicker.
Apple now has Rhapsody as an app, which is a great start, but it is currently hampered by the inability to store locally on your iPod, and has a dismal 64kbps bit rate. If this changes, then it will somewhat negate this advantage for the Zune, but the 10 songs per month will still be a big plus in Zune Pass’ favor.
Hands down, Apple’s app store wins by a mile. It’s a huge selection of all sorts of apps vs a rather sad selection of a handful for Zune. Microsoft has plans, especially in the realm of games, but I’m not sure I’d want to bet on the future if this aspect is important to you. The iPod is a much better choice in that case.
This is getting a bit more subjective, but I much prefer the Zune Marketplace. The interface is colorful, has more flair, and some cool features like ‘Mixview’ that let you quickly see related albums, songs, or other users related to what you’re listening to. Clicking on one of those will center on that item, and another set of “neighbors” will come into view, allowing you to navigate around exploring by similar artists, songs, or users. Speaking of users, the Zune “Social” is also great fun, letting you find others with shared tastes and becoming friends with them. You then can listen to a playlist created based on an amalgamation of what all your friends are listening to, which is also enjoyable. Those concerned with privacy will be relieved to know you can prevent the public from seeing your personal listening habits if you so choose.
If you’re still on the fence: grab your favorite earphones, head down to a Best Buy and ask to plug them into a Zune then an iPod and see which one sounds better to you, and which interface makes you smile more. Then you’ll know which is right for you.
Apple now has Rhapsody as an app, which is a great start, but it is currently hampered by the inability to store locally on your iPod, and has a dismal 64kbps bit rate. If this changes, then it will somewhat negate this advantage for the Zune, but the 10 songs per month will still be a big plus in Zune Pass’ favor.
If you’re still on the fence: grab your favorite earphones, head down to a Best Buy and ask to plug them into a Zune then an iPod and see which one sounds better to you, and which interface makes you smile more. Then you’ll know which is right for you.
This is getting a bit more subjective, but I much prefer the Zune Marketplace. The interface is colorful, has more flair, and some cool features like ‘Mixview’ that let you quickly see related albums, songs, or other users related to what you’re listening to. Clicking on one of those will center on that item, and another set of “neighbors” will come into view, allowing you to navigate around exploring by similar artists, songs, or users. Speaking of users, the Zune “Social” is also great fun, letting you find others with shared tastes and becoming friends with them. You then can listen to a playlist created based on an amalgamation of what all your friends are listening to, which is also enjoyable. Those concerned with privacy will be relieved to know you can prevent the public from seeing your personal listening habits if you so choose.
If you’re still on the fence: grab your favorite earphones, head down to a Best Buy and ask to plug them into a Zune then an iPod and see which one sounds better to you, and which interface makes you smile more. Then you’ll know which is right for you.
Hands down, Apple’s app store wins by a mile. It’s a huge selection of all sorts of apps vs a rather sad selection of a handful for Zune. Microsoft has plans, especially in the realm of games, but I’m not sure I’d want to bet on the future if this aspect is important to you. The iPod is a much better choice in that case.
The new Zune browser is surprisingly good, but not as good as the iPod’s. It works well, but isn’t as fast as Safari, and has a clunkier interface. If you occasionally plan on using the web browser that’s not an issue, but if you’re planning to browse the web alot from your PMP then the iPod’s larger screen and better browser may be important.
This is getting a bit more subjective, but I much prefer the Zune Marketplace. The interface is colorful, has more flair, and some cool features like ‘Mixview’ that let you quickly see related albums, songs, or other users related to what you’re listening to. Clicking on one of those will center on that item, and another set of “neighbors” will come into view, allowing you to navigate around exploring by similar artists, songs, or users. Speaking of users, the Zune “Social” is also great fun, letting you find others with shared tastes and becoming friends with them. You then can listen to a playlist created based on an amalgamation of what all your friends are listening to, which is also enjoyable. Those concerned with privacy will be relieved to know you can prevent the public from seeing your personal listening habits if you so choose.
This is getting a bit more subjective, but I much prefer the Zune Marketplace. The interface is colorful, has more flair, and some cool features like ‘Mixview’ that let you quickly see related albums, songs, or other users related to what you’re listening to. Clicking on one of those will center on that item, and another set of “neighbors” will come into view, allowing you to navigate around exploring by similar artists, songs, or users. Speaking of users, the Zune “Social” is also great fun, letting you find others with shared tastes and becoming friends with them. You then can listen to a playlist created based on an amalgamation of what all your friends are listening to, which is also enjoyable. Those concerned with privacy will be relieved to know you can prevent the public from seeing your personal listening habits if you so choose.
Sorry for the huge review, but I’m really loving the new Zune, and hope this, as well as the excellent reviews some other people have written, will help you decide if it’s the right choice for you.
I’m really impressed with your writing skills and also with the layout on your blog. Is this a paid theme or did you modify it yourself? Either way keep up the nice quality writing, it’s rare to see a nice blog like this one today..
Apple now has Rhapsody as an app, which is a great start, but it is currently hampered by the inability to store locally on your iPod, and has a dismal 64kbps bit rate. If this changes, then it will somewhat negate this advantage for the Zune, but the 10 songs per month will still be a big plus in Zune Pass’ favor.
I’ll gear this review to 2 types of people: current Zune owners who are considering an upgrade, and people trying to decide between a Zune and an iPod. (There are other players worth considering out there, like the Sony Walkman X, but I hope this gives you enough info to make an informed decision of the Zune vs players other than the iPod line as well.)
Between me and my husband we’ve owned more MP3 players over the years than I can count, including Sansas, iRivers, iPods (classic & touch), the Ibiza Rhapsody, etc. But, the last few years I’ve settled down to one line of players. Why? Because I was happy to discover how well-designed and fun to use the underappreciated (and widely mocked) Zunes are.
This is getting a bit more subjective, but I much prefer the Zune Marketplace. The interface is colorful, has more flair, and some cool features like ‘Mixview’ that let you quickly see related albums, songs, or other users related to what you’re listening to. Clicking on one of those will center on that item, and another set of “neighbors” will come into view, allowing you to navigate around exploring by similar artists, songs, or users. Speaking of users, the Zune “Social” is also great fun, letting you find others with shared tastes and becoming friends with them. You then can listen to a playlist created based on an amalgamation of what all your friends are listening to, which is also enjoyable. Those concerned with privacy will be relieved to know you can prevent the public from seeing your personal listening habits if you so choose.
The new Zune browser is surprisingly good, but not as good as the iPod’s. It works well, but isn’t as fast as Safari, and has a clunkier interface. If you occasionally plan on using the web browser that’s not an issue, but if you’re planning to browse the web alot from your PMP then the iPod’s larger screen and better browser may be important.
If you’re still on the fence: grab your favorite earphones, head down to a Best Buy and ask to plug them into a Zune then an iPod and see which one sounds better to you, and which interface makes you smile more. Then you’ll know which is right for you.
This is getting a bit more subjective, but I much prefer the Zune Marketplace. The interface is colorful, has more flair, and some cool features like ‘Mixview’ that let you quickly see related albums, songs, or other users related to what you’re listening to. Clicking on one of those will center on that item, and another set of “neighbors” will come into view, allowing you to navigate around exploring by similar artists, songs, or users. Speaking of users, the Zune “Social” is also great fun, letting you find others with shared tastes and becoming friends with them. You then can listen to a playlist created based on an amalgamation of what all your friends are listening to, which is also enjoyable. Those concerned with privacy will be relieved to know you can prevent the public from seeing your personal listening habits if you so choose.
Hands down, Apple’s app store wins by a mile. It’s a huge selection of all sorts of apps vs a rather sad selection of a handful for Zune. Microsoft has plans, especially in the realm of games, but I’m not sure I’d want to bet on the future if this aspect is important to you. The iPod is a much better choice in that case.
Sorry for the huge review, but I’m really loving the new Zune, and hope this, as well as the excellent reviews some other people have written, will help you decide if it’s the right choice for you.
Between me and my husband we’ve owned more MP3 players over the years than I can count, including Sansas, iRivers, iPods (classic & touch), the Ibiza Rhapsody, etc. But, the last few years I’ve settled down to one line of players. Why? Because I was happy to discover how well-designed and fun to use the underappreciated (and widely mocked) Zunes are.
The new Zune browser is surprisingly good, but not as good as the iPod’s. It works well, but isn’t as fast as Safari, and has a clunkier interface. If you occasionally plan on using the web browser that’s not an issue, but if you’re planning to browse the web alot from your PMP then the iPod’s larger screen and better browser may be important.
What’s Going down i am new to this, I stumbled upon this I have found It positively useful and it has aided me out loads. I’m hoping to give a contribution & help other customers like its helped me. Good job.
I’ll gear this review to 2 types of people: current Zune owners who are considering an upgrade, and people trying to decide between a Zune and an iPod. (There are other players worth considering out there, like the Sony Walkman X, but I hope this gives you enough info to make an informed decision of the Zune vs players other than the iPod line as well.)
This is getting a bit more subjective, but I much prefer the Zune Marketplace. The interface is colorful, has more flair, and some cool features like ‘Mixview’ that let you quickly see related albums, songs, or other users related to what you’re listening to. Clicking on one of those will center on that item, and another set of “neighbors” will come into view, allowing you to navigate around exploring by similar artists, songs, or users. Speaking of users, the Zune “Social” is also great fun, letting you find others with shared tastes and becoming friends with them. You then can listen to a playlist created based on an amalgamation of what all your friends are listening to, which is also enjoyable. Those concerned with privacy will be relieved to know you can prevent the public from seeing your personal listening habits if you so choose.
This is getting a bit more subjective, but I much prefer the Zune Marketplace. The interface is colorful, has more flair, and some cool features like ‘Mixview’ that let you quickly see related albums, songs, or other users related to what you’re listening to. Clicking on one of those will center on that item, and another set of “neighbors” will come into view, allowing you to navigate around exploring by similar artists, songs, or users. Speaking of users, the Zune “Social” is also great fun, letting you find others with shared tastes and becoming friends with them. You then can listen to a playlist created based on an amalgamation of what all your friends are listening to, which is also enjoyable. Those concerned with privacy will be relieved to know you can prevent the public from seeing your personal listening habits if you so choose.
Hands down, Apple’s app store wins by a mile. It’s a huge selection of all sorts of apps vs a rather sad selection of a handful for Zune. Microsoft has plans, especially in the realm of games, but I’m not sure I’d want to bet on the future if this aspect is important to you. The iPod is a much better choice in that case.
Greetings! Very helpful advice on this article! It is the little changes that make the biggest changes. Thanks a lot for sharing!
The new Zune browser is surprisingly good, but not as good as the iPod’s. It works well, but isn’t as fast as Safari, and has a clunkier interface. If you occasionally plan on using the web browser that’s not an issue, but if you’re planning to browse the web alot from your PMP then the iPod’s larger screen and better browser may be important.
Hands down, Apple’s app store wins by a mile. It’s a huge selection of all sorts of apps vs a rather sad selection of a handful for Zune. Microsoft has plans, especially in the realm of games, but I’m not sure I’d want to bet on the future if this aspect is important to you. The iPod is a much better choice in that case.
You actually make it seem really easy with your presentation but I to find this matter to be actually one thing that I believe I’d by no means understand. It kind of feels too complex and very vast for me. I am having a look forward for your subsequent put up, I’ll attempt to get the cling of it!
Some really quality content on this web site, bookmarked.
What’s Taking place i am new to this, I stumbled upon this I’ve discovered It positively helpful and it has aided me out loads. I am hoping to contribute & help different customers like its helped me. Great job.
Hands down, Apple’s app store wins by a mile. It’s a huge selection of all sorts of apps vs a rather sad selection of a handful for Zune. Microsoft has plans, especially in the realm of games, but I’m not sure I’d want to bet on the future if this aspect is important to you. The iPod is a much better choice in that case.
The Zune concentrates on being a Portable Media Player. Not a web browser. Not a game machine. Maybe in the future it’ll do even better in those areas, but for now it’s a fantastic way to organize and listen to your music and videos, and is without peer in that regard. The iPod’s strengths are its web browsing and apps. If those sound more compelling, perhaps it is your best choice.
Sorry for the huge review, but I’m really loving the new Zune, and hope this, as well as the excellent reviews some other people have written, will help you decide if it’s the right choice for you.
Zune and iPod: Most people compare the Zune to the Touch, but after seeing how slim and surprisingly small and light it is, I consider it to be a rather unique hybrid that combines qualities of both the Touch and the Nano. It’s very colorful and lovely OLED screen is slightly smaller than the touch screen, but the player itself feels quite a bit smaller and lighter. It weighs about 2/3 as much, and is noticeably smaller in width and height, while being just a hair thicker.
Between me and my husband we’ve owned more MP3 players over the years than I can count, including Sansas, iRivers, iPods (classic & touch), the Ibiza Rhapsody, etc. But, the last few years I’ve settled down to one line of players. Why? Because I was happy to discover how well-designed and fun to use the underappreciated (and widely mocked) Zunes are.
Apple now has Rhapsody as an app, which is a great start, but it is currently hampered by the inability to store locally on your iPod, and has a dismal 64kbps bit rate. If this changes, then it will somewhat negate this advantage for the Zune, but the 10 songs per month will still be a big plus in Zune Pass’ favor.
Apple now has Rhapsody as an app, which is a great start, but it is currently hampered by the inability to store locally on your iPod, and has a dismal 64kbps bit rate. If this changes, then it will somewhat negate this advantage for the Zune, but the 10 songs per month will still be a big plus in Zune Pass’ favor.
Apple now has Rhapsody as an app, which is a great start, but it is currently hampered by the inability to store locally on your iPod, and has a dismal 64kbps bit rate. If this changes, then it will somewhat negate this advantage for the Zune, but the 10 songs per month will still be a big plus in Zune Pass’ favor.
Between me and my husband we’ve owned more MP3 players over the years than I can count, including Sansas, iRivers, iPods (classic & touch), the Ibiza Rhapsody, etc. But, the last few years I’ve settled down to one line of players. Why? Because I was happy to discover how well-designed and fun to use the underappreciated (and widely mocked) Zunes are.
This is a must-read for anyone interested in this subjectwell-researched, well-written, and full of insights that you cant find elsewhere.
This is getting a bit more subjective, but I much prefer the Zune Marketplace. The interface is colorful, has more flair, and some cool features like ‘Mixview’ that let you quickly see related albums, songs, or other users related to what you’re listening to. Clicking on one of those will center on that item, and another set of “neighbors” will come into view, allowing you to navigate around exploring by similar artists, songs, or users. Speaking of users, the Zune “Social” is also great fun, letting you find others with shared tastes and becoming friends with them. You then can listen to a playlist created based on an amalgamation of what all your friends are listening to, which is also enjoyable. Those concerned with privacy will be relieved to know you can prevent the public from seeing your personal listening habits if you so choose.
Regards for this terrific post, I am glad I found this website on yahoo.
This perspective really made me think differently about an issue I thought I had all figured out. The way you challenged conventional wisdom was thought-provoking. I’ll be considering your points in my own approach moving forward.
Hands down, Apple’s app store wins by a mile. It’s a huge selection of all sorts of apps vs a rather sad selection of a handful for Zune. Microsoft has plans, especially in the realm of games, but I’m not sure I’d want to bet on the future if this aspect is important to you. The iPod is a much better choice in that case.
Some genuinely prize posts on this site, saved to fav.
I’ll gear this review to 2 types of people: current Zune owners who are considering an upgrade, and people trying to decide between a Zune and an iPod. (There are other players worth considering out there, like the Sony Walkman X, but I hope this gives you enough info to make an informed decision of the Zune vs players other than the iPod line as well.)
The Zune concentrates on being a Portable Media Player. Not a web browser. Not a game machine. Maybe in the future it’ll do even better in those areas, but for now it’s a fantastic way to organize and listen to your music and videos, and is without peer in that regard. The iPod’s strengths are its web browsing and apps. If those sound more compelling, perhaps it is your best choice.
The Zune concentrates on being a Portable Media Player. Not a web browser. Not a game machine. Maybe in the future it’ll do even better in those areas, but for now it’s a fantastic way to organize and listen to your music and videos, and is without peer in that regard. The iPod’s strengths are its web browsing and apps. If those sound more compelling, perhaps it is your best choice.
Sorry for the huge review, but I’m really loving the new Zune, and hope this, as well as the excellent reviews some other people have written, will help you decide if it’s the right choice for you.
I’ll gear this review to 2 types of people: current Zune owners who are considering an upgrade, and people trying to decide between a Zune and an iPod. (There are other players worth considering out there, like the Sony Walkman X, but I hope this gives you enough info to make an informed decision of the Zune vs players other than the iPod line as well.)
The Zune concentrates on being a Portable Media Player. Not a web browser. Not a game machine. Maybe in the future it’ll do even better in those areas, but for now it’s a fantastic way to organize and listen to your music and videos, and is without peer in that regard. The iPod’s strengths are its web browsing and apps. If those sound more compelling, perhaps it is your best choice.
Sorry for the huge review, but I’m really loving the new Zune, and hope this, as well as the excellent reviews some other people have written, will help you decide if it’s the right choice for you.
Between me and my husband we’ve owned more MP3 players over the years than I can count, including Sansas, iRivers, iPods (classic & touch), the Ibiza Rhapsody, etc. But, the last few years I’ve settled down to one line of players. Why? Because I was happy to discover how well-designed and fun to use the underappreciated (and widely mocked) Zunes are.
The Zune concentrates on being a Portable Media Player. Not a web browser. Not a game machine. Maybe in the future it’ll do even better in those areas, but for now it’s a fantastic way to organize and listen to your music and videos, and is without peer in that regard. The iPod’s strengths are its web browsing and apps. If those sound more compelling, perhaps it is your best choice.
Your article helped me a lot, is there any more related content? Thanks!
Sorry for the huge review, but I’m really loving the new Zune, and hope this, as well as the excellent reviews some other people have written, will help you decide if it’s the right choice for you.
I’ll gear this review to 2 types of people: current Zune owners who are considering an upgrade, and people trying to decide between a Zune and an iPod. (There are other players worth considering out there, like the Sony Walkman X, but I hope this gives you enough info to make an informed decision of the Zune vs players other than the iPod line as well.)
The Zune concentrates on being a Portable Media Player. Not a web browser. Not a game machine. Maybe in the future it’ll do even better in those areas, but for now it’s a fantastic way to organize and listen to your music and videos, and is without peer in that regard. The iPod’s strengths are its web browsing and apps. If those sound more compelling, perhaps it is your best choice.
Apple now has Rhapsody as an app, which is a great start, but it is currently hampered by the inability to store locally on your iPod, and has a dismal 64kbps bit rate. If this changes, then it will somewhat negate this advantage for the Zune, but the 10 songs per month will still be a big plus in Zune Pass’ favor.
The Zune concentrates on being a Portable Media Player. Not a web browser. Not a game machine. Maybe in the future it’ll do even better in those areas, but for now it’s a fantastic way to organize and listen to your music and videos, and is without peer in that regard. The iPod’s strengths are its web browsing and apps. If those sound more compelling, perhaps it is your best choice.
The Zune concentrates on being a Portable Media Player. Not a web browser. Not a game machine. Maybe in the future it’ll do even better in those areas, but for now it’s a fantastic way to organize and listen to your music and videos, and is without peer in that regard. The iPod’s strengths are its web browsing and apps. If those sound more compelling, perhaps it is your best choice.
Your point of view caught my eye and was very interesting. Thanks. I have a question for you.