TechSherGole

Spread the love

How to Update PowerShell on Windows 10 and 11

How to Update PowerShell on Windows 10 and 11

Introduction: How to Update PowerShell on Windows 10 and 11

Why Update PowerShell on Windows 10 and 11?

Before delving into the techniques, it’s important to comprehend why PowerShell updates are necessary:

  • Security Enhancements: Security patches are routinely issued with upgraded versions to guard against vulnerabilities.
  • Features updates: Stay informed about the most recent additions and improvements.
  • Compatibility: Make sure your modules and scripts are compatible with the most recent versions.

Methods to Update PowerShell

1. Windows Update

Using the Windows Update function is the easiest way to update PowerShell. How to do it is as follows:

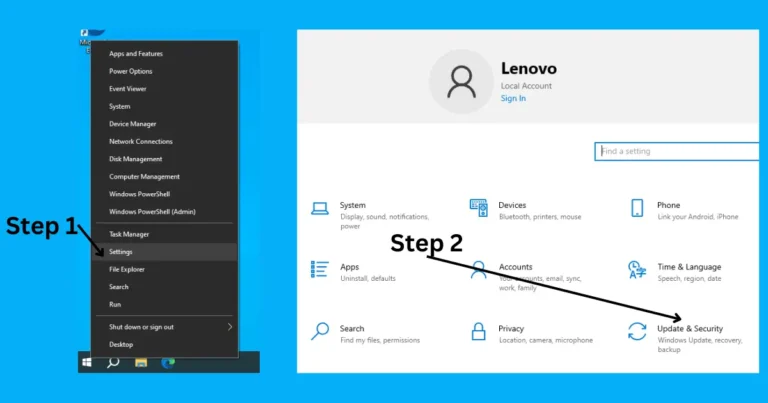
  • Check for Updates:

     Settings > Update & Security > Windows Update.

     Click on Check for updates.

  • Install Updates:

     A more recent version of PowerShell will be shown under the updates if one is available.

     Click on Install Now or follow the on-screen instructions to complete the update.

How to Update PowerShell on Windows 10 and 11

2. Using Windows PowerShell

If you would rather use PowerShell to update itself, do the following actions:

Open PowerShell as Administrator:

     Right-click on the Start menu and select Windows PowerShell (Admin).

Update with Package Management:

     Use the following command to update the PowerShellGet module:

      powershell

     Copy code

     Install-Module -Name PowerShellGet -Force -SkipPublisherCheck

     Once updated, use the following command to update PowerShell itself:

      powershell

     Copy code

     Update-Module -Name PowerShellGet

3. Downloading from Microsoft

The most recent version of PowerShell can be manually downloaded and installed from the Microsoft website:

Visit the Official Page:

Navigate to the PowerShell GitHub releases page.

Choose the Installer:

Select the appropriate installer for your system architecture (x64, x86).

Run the Installer:

Double-click the downloaded installer and follow the on-screen instructions to update PowerShell.

4. Using the Microsoft Store

For Windows 10 users, PowerShell is available on the Microsoft Store, making it easy to update:

  • Open Microsoft Store: Search for PowerShell in the Microsoft Store search bar.
  • Check for Updates: Click the Update button next to the PowerShell application to see if there is an update available.

5. Making use of WMF, or the Windows Management Framework

The Windows Management Framework provides updates for older versions of Windows. Here’s how to use WMF:

1. Download WMF:

Visit the Microsoft Download Center and download the appropriate WMF version.

2. Install WMF:

Run the downloaded installer and follow the prompts to update PowerShell.

Verifying the Update

Following any of the aforementioned methods for updating PowerShell, it is imperative to confirm the installation:

1. Open PowerShell:

Type powershell in the Start menu search and select Windows PowerShell.

2. Check Version:

Enter the following command to check the installed PowerShell version: PowerShell Copy code$PSVersionTable.PSVersion

Considerations

  • Backup: To prevent losing any crucial data, always make a copy of your scripts and settings before updating.
  • Compatibility: Verify that any modules or scripts you use are compatible with PowerShell’s most recent release.
  • Reboot: It is occasionally necessary to restart your system in order to finish the updating procedure.

Conclusion

For Windows, PowerShell updates are necessary for compatibility, security, and new feature access. This tutorial covers every way to maintain the most recent version of your PowerShell environment, whether you prefer manual installations or automated upgrades through Windows Update. Always double-check the update and take compatibility concerns into account to guarantee a smooth update to the most recent PowerShell version.

FAQs

Absolutely! Think of updating PowerShell like getting the latest superhero suit – it comes with better features and bug fixes. Newer versions often bring enhancements and security patches, ensuring your scripting and automation game is up to speed. It’s like giving your digital helper the latest gadgets for the job.

Not exactly. PowerShell updates aren’t always bundled with normal Windows updates. You’ll need to visit the PowerShell GitHub page or use tools like PowerShellGet to snag the current version. Think of it as a VIP club for PowerShell enthusiasts – you get to decide when you want the latest and best.

Think of updating PowerShell as giving your digital sidekick a monthly check-up. While you don’t need to do it daily, keeping up-to-date with the latest releases, especially when new features or security patches are introduced, is a good practice. Aim for updates whenever a stable release with enhancements aligns with your process.

Absolutely! PowerShell is pretty chill about sharing space. You can have different versions coexisting on your system without sparking a digital civil war. This allows you to test your scripts and transition gradually, providing a smooth experience with the latest version.

Not out of the box. PowerShell won’t sneak in an update without your approval. You have the reins on when and how you want to change. Keep an eye on the GitHub Releases page, set a reminder, and give PowerShell the green light when you’re ready for the change.

1 thought on “How to Update PowerShell on Windows 10 and 11”

Leave a Comment

Your email address will not be published. Required fields are marked *

Scroll to Top